Monday, June 3, 2013

Finished

I have been working on the coif off and on for the past several weeks.  No new posts, because it was just doing the same thing as before.

I am now calling it finished.  I guess I could make it wider on the shoulders, but I am calling it good.

Here is a picture of the final product.


My brother Joe (yes the one who started this all) is coming state side for a visit this summer, so I will have a chance to give it to him.  I am sure that we will all get a good giggle out of it. 

Monday, April 8, 2013

Here we go again

When I last worked on the coif, this is what it looked like:


The project is starting to get pretty big, and pretty heavy.  I found that adding ring while the coif was on "Bob" was not as easy as I was expecting.  So instead I took the coif off of Bob and laid it flat on the work table with the center of the coif all bunched up and lumped into the middle.  Like this:


I have added about 4 rows to the bottom of the coif.  Which does not sound like a lot, but it is quite a bit of material once you get to this point.  
The goal is to continue to add rows to the bottom of the coif until it reaches the shoulders when worn.  This is where I am at right now:


I'm back

It has been a little while since I have had a chance to work on Joe's coif.  I was in charge of our cubs scout pack's Blue and Gold banquet this year, so the chain maille had to be set aside for a while. 

Now that the banquet is finished, and spring break has come and gone, it is time to get back to working on the coif.  It is not too far from being finished. 


Tuesday, February 5, 2013

V-neck

I had originally thought to add an additional row of 4-in-1's all the way along the bottom, and connect the front together at this point.
But when looking at it, it seemed that the length was already long enough, so I made one small string of chain maille, and placed it in the front to connect the bottom sides of the face piece. 
I had though about making a V-neck style to the coif.  I started at the bottom, and worked my way up, each time linking one less ring.  It worked pretty well.  On the second side, I got a bit messed up.  I am not sure what happened.  I think I just got confused as to how many rings I needed, and where exactly I was in the diagonal.  But in the end it all worked out well. 

More of the same

When doing any crafty type project you get to the point where you seem you just keep doing the same thing.  Sure you are making progress, your project is growing, becoming more complete.  But it feels like you are just doing the same motion, the same task over and over and over again. 

This is the stage which I have reached on the coif project. 

Cutting more rings, opening rings, closing rings.  Making more 4-in-1's, more strings, attaching strings,

I have added another two strings of 4-in-1's onto the end of the coif.  I would say that it is not about shoulder length. 

 
More strings of 4-in-1's
Attaching strings
 1st new row
2nd new row
 
 
While working on the additional rows the other day, I looked across the chain maille, and though to myself "chain maille is pretty".  And it sort of is in an odd way.  Maybe this is my clue that I have been working on this too long.  What do you think?


Sunday, February 3, 2013

Bringin' in the sides

Next step, link together the sides of all of lengthened pieces.  Pretty simple.  Though you do have to keep an eye on which rings you are catching.  There were a few times that I did not pay close enough attention, and grabbed one too many rings, or not enough, or even a ring from a different row.  But I was able to sort it all out. 

I put the coif on Bob to see what it looks like to this point.  It is taking shape rather well.  Looks like I need to add some more length to it before attaching it under the chin, then working on the mantel (the part that drapes around the neck).


Friday, February 1, 2013

Add on's

I finished 5 small pieces of rectangles, which are to be attached to the cap piece. 

This is what the construction looked like:


Not much else to say about this step.  Next is to bring all the side pieces together.  


Wednesday, January 30, 2013

sewing with metal

Making progress in the face piece.  Started with strings of 4-in-1's which are 7 long.  And put three stings together. 


As I am linking all of the strings together I thought it was sort of like sewing, but with metal instead of thread.  Never in my life did I ever think I would make chain maille. 

Next step is to attach each of these small sheets of maille to the cap piece.  Adding them to the stings I added on earlier. 

Meet Bob

As I start to add chain maille to this project, it will start to lengthen the project.  Right now it still will lay flat on the work table, but soon it will not be able to do that.

I was thinking that it might be hard to keep track of where I was at in the project if it got all bunched up on the table. 

So I went in search of some help.  And found Bob. 


As you can see Bob is trying on the cap piece.  Bob's head is a bit smaller than Joe's.  So the cap piece is a bit large on Bob.  This will be a great help in the construction process.

As a side note, my little boys love this foam head, they think it is hilarious.  And they love that we named him.  The hard part will be getting them to leave it alone. 

Spacing a hole for the face

With this next step, I made a whole bunch of strings of 4-in-1's, each string was 7 4-in-1's long. 

I wanted to make sure that I was able to find the correct spacing for the face hole. 

I added a sting of 4-in-1's all along the edge of the finished head band/cap piece, I was able to put 5 stings along the cap piece, and it left a perfect amount of room for a hole for the face.  I was pretty happy with how that worked out.


For now I left each string just attached to the cap piece, and not to each other.  When I added the new strings of 4-in-1's I was not sure if I would end up having to take some off or adjust.  So I left the sides un-connected.

I might leave it undone for a bit while I work on some small sheets of chain maille to attach to each piece to extend it down towards the shoulders. 

If I were to attach the sides at this point, it would not longer lay flat on the work table.  Which is one of the reasons I left the sides detached. 

Wednesday, January 23, 2013

Not part of the plan

I bought some more wire today.  Tonight I started working on making some more coils.  Last time I did 5-6 coils at a time, and made more as I went.  Tonight I was thinking I might just sit down and take the time to put all 200 feet of wire into coils. 

I got 3 coils made and at the end of the fourth coil this happened:


This was NOT part of the plan.  My dowel snapped in half.

I can't remember if I wrote about switching over to a wooden dowel or not.  I decided to give it a try, because I could drill a small hole near the drill end.  Place the start of the wire in the hole, and it is much easier to start the wire this way. 
The wooden dowel was a bit long then the metal screw I had been using.  And I was not able to drill a hole into the metal dowel.  I need a vise or something to hold it steady, and I don't have one.

I will make a new dowel tomorrow and continue with the coils. 

Tuesday, January 22, 2013

Starting the face piece

Now that the cap is finished, I am starting to work on the face piece as it is referred to.  The face piece goes from one ear, behind the head to the other ear.  Leaving the face exposed.

I think that the best was to do this is to use the 4-in-1 method, and just build a large rectangular sheet of chain maille, then connect it to the cap piece.

I am thinking I might add one string of 4-in-1's along the bottom of the cap piece to give reference to how long of a rectangle I need.  If I can count the number of 4-in-1's in the string at the bottom of the cap, I can easily make the rectangle that same size then just attach it once it is done.

For a start I attached seven 4-in-1's together.  I was able to make seven small strips, with seven 4-in-1's in each strip.


I am thinking that I will connect all these small strips together and add then to the bottom of the cap for reference length.  

This is that last of my rings.  I had finished cutting all the coils I had made, and have not officially used up all the rings made from my 200 feet of wire.  Tomorrow I will try to get to the store and buy some more wire, and continue the work. 

Is it really needed?

This is mostly just a side note to myself, so that when I made another coif, I can remember what I found along the way.

The instructions I saw on the internet indicated constructing the head band first, and work towards expanding the cap piece until it matches the head band. 

But as I was nearing the end of the cap construction, I began to think that a headband piece is really not needed.  If the person who you are constructing the coif for is with you, it is just as easy to keep adding rows of rings until you get to the length that is needed.  And just skip adding the head band all together. 

On the flip side, if you are making the coif for someone who is not with you (like my brother) then using a head band is a good guide to get to the right size.

Now I just need to figure out how to construct the cap and actually get it to match up to the size of the head band.  I guess I will see if I can get it matched up better next time.

Adding the headband

I got to the point where the cap piece was just a bit above my eyebrows when I put it on my head, so I figured that it was time to add the headband piece.  So I simply started on one end and started connecting it.


When I made the headband I thought it was going to be way too big, when I put it around my head, stretched out, it was far to long.  But when I added it to the cap piece I found that the headband was not long enough. 
Obviously something went a bit wrong.  I think I put too many expansion pieces in the cap piece along the way, which made it bigger than necessary.
When I put the finished cap piece on my head, it fits really well, but it is a bit loose around the head.  I thought that I could try to take a wedge out of it and try to make it tighter around the head.  And I might do that down the road, but I am going to leave it for now.  And if I think it needs to be adjusted when it is finished, I will do it at that point. 

Here is a picture of the finished cap piece including the head band.  It is 12 inches across. 


Friday, January 18, 2013

Still working

It has been a couple of days and I have been working on the cap piece of the coif when I have had time.  It is slow going, but slowly the cap piece is getting larger.

Here is a current picture:


It is 9 inches across.  I think it will take about another inch or so until it will be long enough to add the headband piece.  I think I am right about at 16 rows, I just did a quick count, so I might be off by one or so. 

Once again I am out of rings, and I just made seven more coils.  And used the rest of the wire which I bought.  So I will need to buy some additional wire.  Seven coils will make a lot of rings, but not nearly enough.  The wire I bought was 200 ft.  Granted some of that did not actually make it to rings because of some trial and error in the beginning, and the bits at the beginning and ends of each coil.  It will be quite interesting to see how many feet of wire I end up using in this crazy project. 

Tuesday, January 15, 2013

Going in circles

I had began the construction of the coif in my previous post.  All was going well until I reached row 5.  I had continued the construction of the coif with my idea of adding expansion rings in every row.  But by the time I got to row 5 things were starting to look a little off.  But I continued on.

After I finished row 6, I could see that something indeed had gone wrong.  The rings were not laying flat, they looked as if they were bunched together.

So I went back and took off the rings of row 6.  Then took out all of the expansion rings in row 5.  From there, I put the rings of row 6 back on.  Then continued to do an additional 2 rows with no expansion rings in those rows.

Now the rows look much more smooth, no bunching.  Here is a current picture.


This is 9 rows of rings.  My plan from here is to put expansion rings on row 9, and then add two rows with no expansion rings, and see how things go.  Worst case, I take the rings off.

On a side note, I had to make additional rings.  I had made five coils. 
By the time I had finished cutting all of the rings off my hand hurt, a lot.  I now have quite a few rings, and hope that I will not have to make more for a little while at least. 

Monday, January 14, 2013

Coif construction

To begin making a coif you start with a larger center ring, which some people refer to as the mother ring. None of the dowels I had were big enough, so I ended up using a highlighter marker to wrap the wire around and make a coil which was an appropriate size.


I added 12 normal rings onto the mother ring.


Take note that all of the rings are flowing in the same direction.  From here I added an additional 12 rings.  Putting one new ring through two rings on the project.  If you notice in the picture where two rings overlap, you slip the new open ring through the overlapped space, then close the ring.

At this point you need to start to add some expansion rings.  You need add rings to the project so that you can build the circle bigger.  This is a picture of the expansion process which best shows where the new rings are placed.  I found this picture on the internet, and it uses red rings to show where the expansion rings are placed.


This is my project after an expansion set is placed. 


Another picture with a fourth row added.


Notice that each layer of rings is flowing a different direction.  This is true for straight chain maille also.  One row will flow to the left, the next to the right and so on.

This is all I as able to get done for now.  I ran out of rings and must cut some more before I can continue.
I plan to continue this same process, adding a new row, adding expansion rings, and continuing along.  I will post some additional pictures after I have progressed a bit further.

headband

I finished the headband this morning, I think it turned out well.  But it has led to questions of exactly how long the headband needs to be.

I measured my head, right above the eyebrows and above the ears.  And then asked my sisters to do the same.  I also asked Joe if he might be able to find a way to measure his head.  But I know his resources are a bit more limited.  So I thought if everyone measured their heads I could get a good average of head size.

My goal was to make a headband that is about 23 inches long.  But chain maille is a bit tricky.


I carefully lay the chain maille out across my worktable.  As you can see it it a nice neat tight pattern.  And I am pretty pleased with the result.
But chain maille stretches a bit, well okay, a lot:


When stretched out the chain maille is significantly longer then before.  And even though Joe has a rather large head, I doubt it is 27 inches around!

So what to do??

At this point I have decided to do nothing at all.  My next step is to start working on the cap section of the coif.  From my experiences with chain maille, I am predicting that when the "in progress" cap piece is placed over a head that the links will stretch out, similar to the second headband picture.  I will start the cap and periodically test it out to see how it stretches, and exactly what size the headband needs to be.  

Sunday, January 13, 2013

4-in-1

I am going to use the 4-in-1 method of constructing chain maille.  There are a few different ways to make chain maille, 6-in-1, kings maille, and I am sure many many more.  The 4-in-1 method works well for me, so I am sticking with it.

First thing to do is get 1 open ring.
Add 4 closed rings onto the open ring.
Close the open ring.
Now you have a completed 4-in-1.
Now make a LOT of them.
This is a start, but I will need many more. 

This is where it can get tricky.  You take two 4-in-1's.  Make sure that they are oriented in the same direction.  Take the two of the 4-in-1's, overlap them slightly.  Thread the open ring through the overlapped rings in such a way that you capture the top rings, going down through the rings.  Continue to thread the open ring through the bottom two rings, going up through them.  Then close the open ring.  

If done correctly the new ring which has just been added will lay in the correct direction.  It is hard to accurately describe how to do this in writing.  It is much easier to see it done in person, or watch a video tutorial.  You can search chain maille 4-in-1 and get many options on tutorials.  

After you link several 4-in-1's together you can see how everything aligns.  


Continue linking 4-in-1's together until you have reached the length needed to fit around your head.  
I will post a picture on the headband once I get it completed. 

Where to start.

Since I have never made a chain maille coif before, I have watched several tutorial or demonstrations on the internet.  Trying to get in idea of how to construct a coif, what is the best method, what steps are best to follow.  And from this I have come up with a game plan.  It may not be the correct or traditional way to make a coif, but I am sort of winging this.  So I am going to try the, trial and error adjust as you go method. 

I came across this picture which I think best explains the different parts of a coif.


The first part I am going to make is the headband.  This will be a strip of 4-in-1 chain maille, linked together and long enough to go around the head just above the eyebrows and ears.  

After the headband piece is made, I will start on the cap portion.  

From what I had read if you start with the headband then you have a reference to guide you as to how big around the bottom part of cap needs to be.  After all you will be connecting the bottom of the cap to the headband.  

As I said before, this will all be about trial and error, figuring it out as I go.  With this general game plan in mind, I will get started. 

Saturday, January 12, 2013

Opened or Closed?

Once you have gathered or made a large quantity of cut rings, you need to decide if you want your rings opened or closed.  Or a combination thereof.

When making a large piece of Chain Maille, you will need a combination of both open and closed rings.  Though you will need the majority of the rings closed.  When making the top part of a coif, the part that curves around the top of the head, you will need open ring.  

You will need a couple of pliers.  If you are making jewelry from jump rings you will want to make sure to buy some pliers which do not have "teeth".  Flat or smooth pliers will not scrape the rings.  For my project it does not matter quite so much.  But I still want it to look as nice as possible, so I am using my smooth pliers.  I am using two types, one normal style, and one pair of curved pliers.


Take one ring.  Grasp it with two pliers, one on each side of the ring with the cut end of the ring at the top in-between the two pliers.


Gently bring one hand towards you while pushing the other hand away from you, which will open the ring. This is not the best picture example of it, but hopefully it will give an idea of what to do.


 You never want to pull the rings apart left to right.  It is nearly impossible to bring them back to a completely round shape afterwards.

To make a closed ring it is the same process, but rather than twisting the ring open, bring both ends so that they meet up and close.  Some times you will need to move one end just past the "closed" position.  Then move it slightly back to give a completely closed look.  There are times when you will close the ring, without going past the "closed" position.  When you put the ring down it will still look like it is not completely closed.  Bringing the ring just beyond the closed position, then back again to a true closed position will help the ring hold it's closed shape.

Picture of open rings:


Picture of closed rings:


Notice how the ends of each ring meet together to make a round flat ring. 

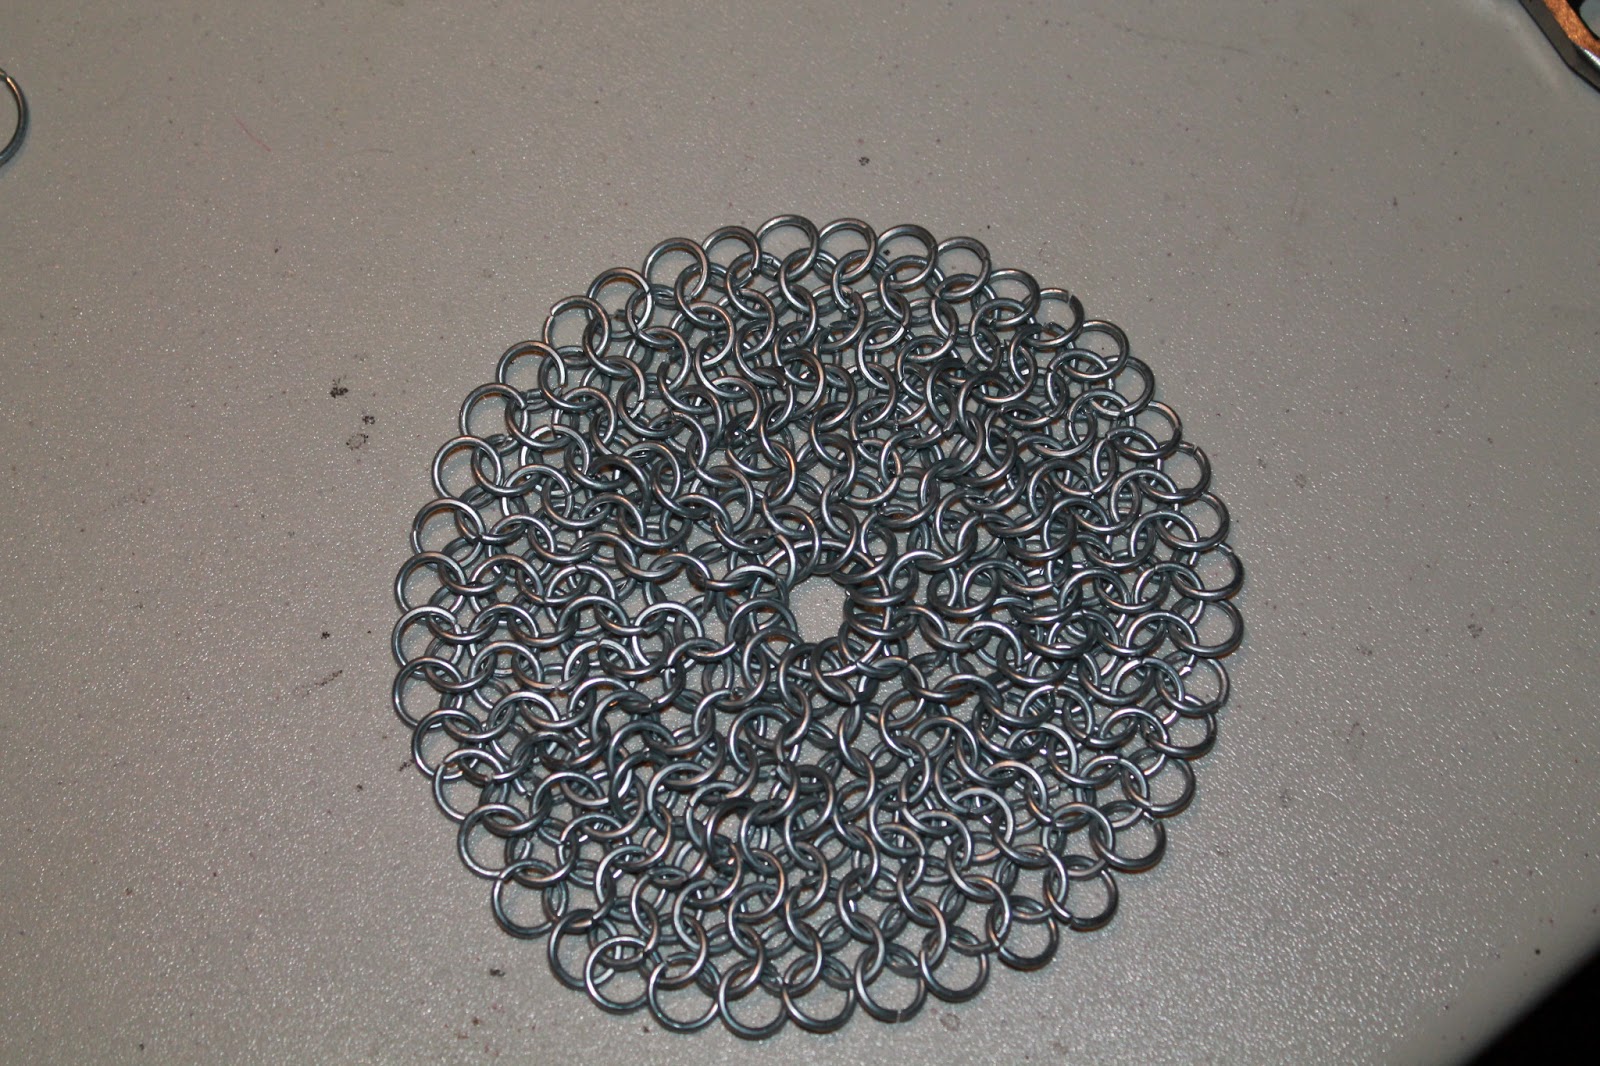
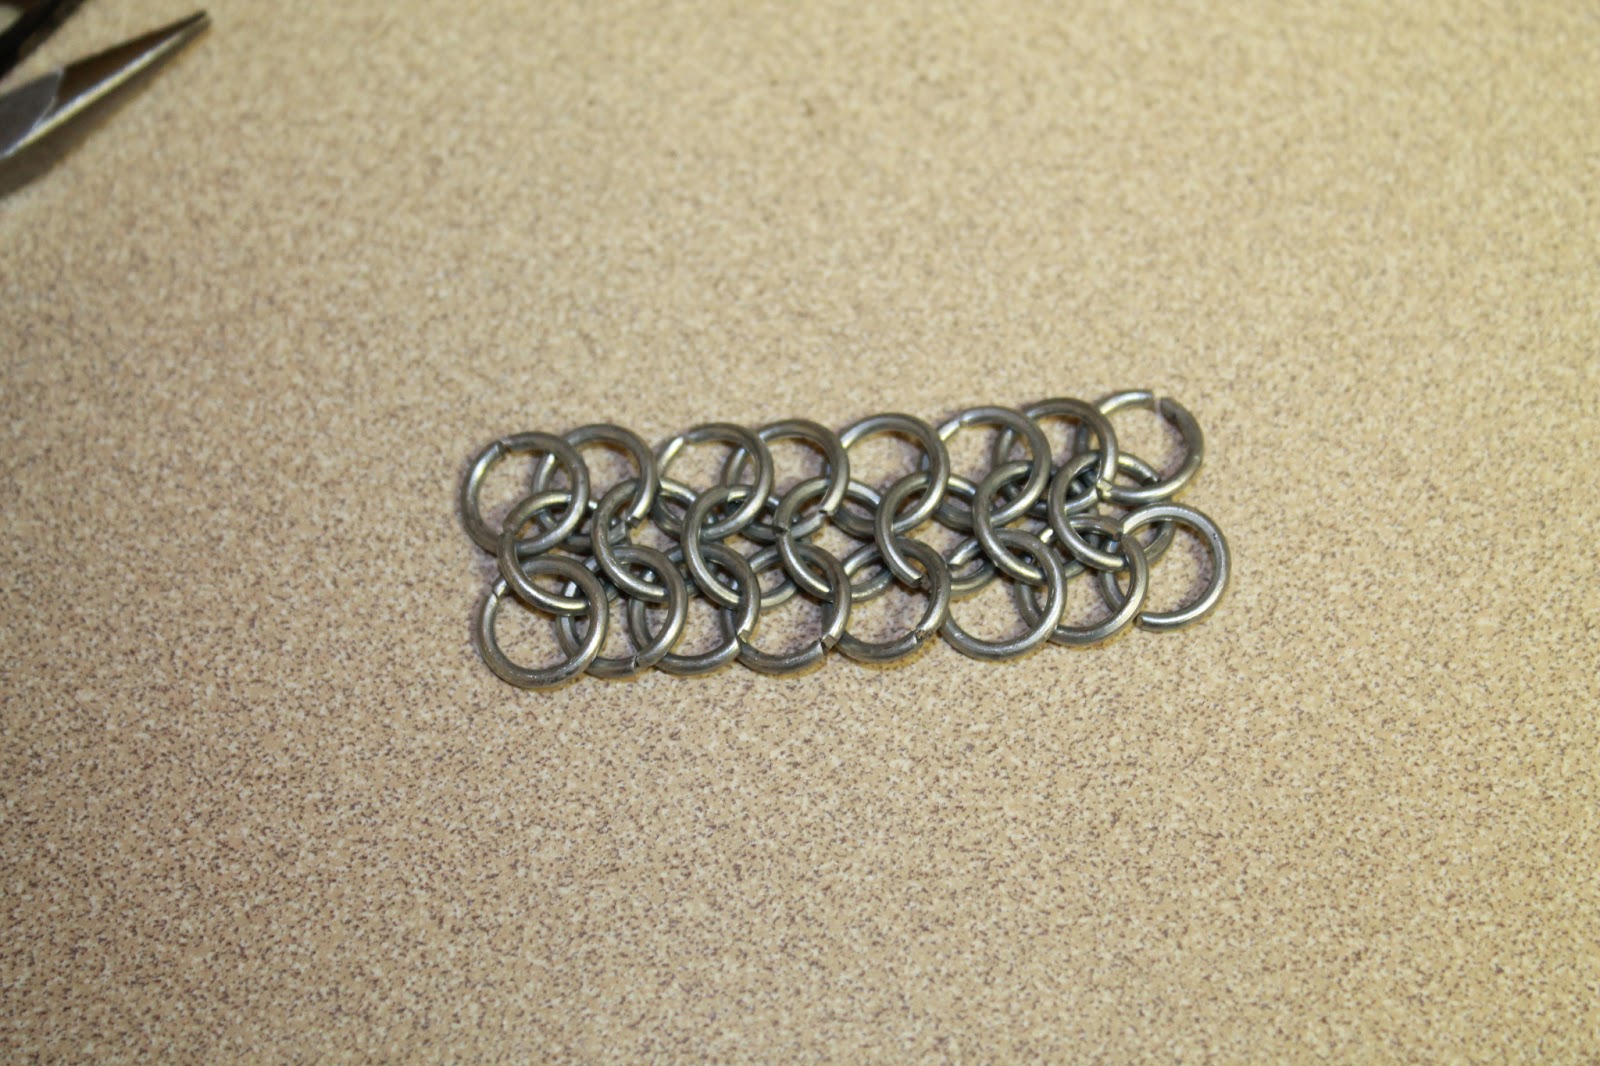
Now that I have a good number of closed and open rings, it is time to start the construction of our coif!